Experienced PC gamers know that every bit of performance counts. Windows 11 is pretty good out-of-the-box, but if you’re the kind of gamer who loves tweaking, there are some advanced BIOS settings and hidden Windows registry hacks that might squeeze out a few extra FPS or reduce stutters. In this tutorial-style guide, we’ll go gamer-to-gamer through various tweaks – from enabling cool BIOS features like Resizable BAR to disabling pesky background timers – all with the goal of boosting your gaming performance. Remember: these tweaks are for advanced users. Always proceed with caution, and back up settings before you change them. (Seriously, back up your registry or create a restore point – you’ll thank yourself later.) Also, change one thing at a time and test, so if something goes wrong, you know the culprit. Now, let’s dive in.
(If you want to cover the more basic optimizations first – like power plans, drivers, and game mode – check out our complete guide to optimizing Windows 11 for maximum gaming performance for the fundamentals. But here, we’re focusing on the fun stuff for tweak enthusiasts.)
Enable resizable bAR for better GPU performance
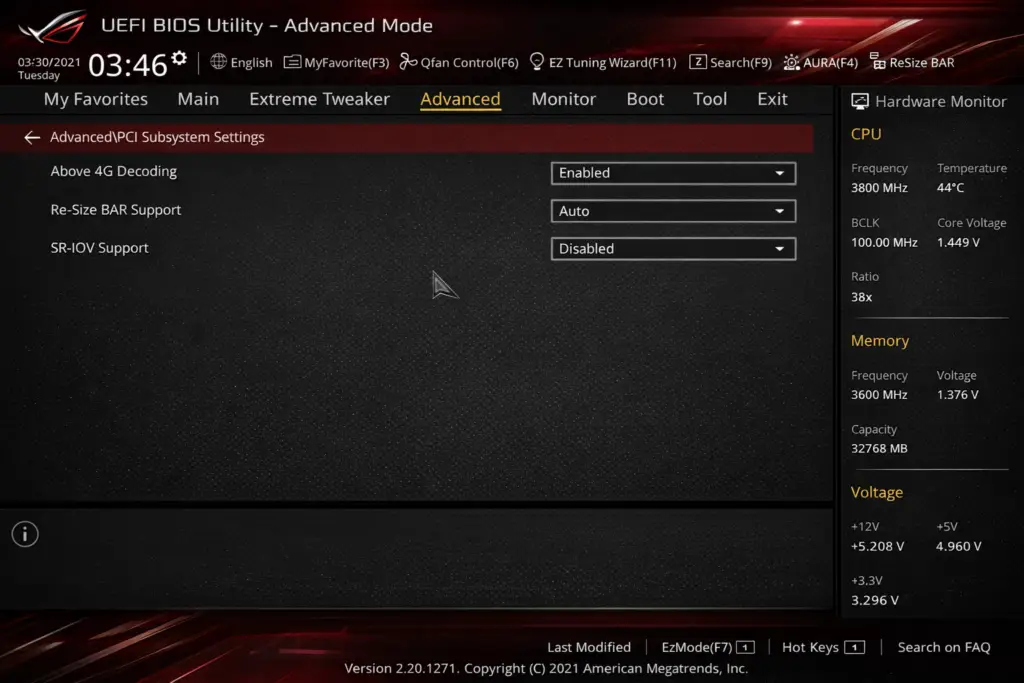
Enabling “Above 4G Decoding” and “Re-Size BAR Support” in an ASUS UEFI BIOS. Resizable BAR (ReBAR) is a PCIe feature that lets your CPU access all of your GPU’s VRAM at once instead of small chunks. Modern gaming PCs support a feature called Resizable BAR (Base Address Register), known as “ReBAR” – AMD calls it Smart Access Memory (SAM). When enabled in BIOS (and supported by your CPU + motherboard + GPU combo), this allows the processor to see and utilize the entire graphics card memory instead of being limited to a 256 MB window. By removing that bottleneck, ReBAR can boost frame rates or at least improve 1% low FPS (those occasional dips) in many games, making gameplay feel smoother. Some titles benefit more than others – for example, in one test average FPS improved ~6% and 1% lows jumped 27% with ReBAR on. It’s not magic in every game, but it tends to help open-world or CPU-heavy games where streaming lots of textures/data between CPU and GPU is a thing.
How to enable it:
ReBAR requires UEFI (no Legacy/CSM boot), so first ensure your Windows is installed in UEFI mode. Then hop into your BIOS settings. Under PCIe or advanced chipset settings, enable “Above 4G Decoding” (this is usually a prerequisite) and then enable Resizable BAR Support (sometimes just an “On/Off” toggle, or “Auto”). Save and reboot. In Windows, you can confirm it’s working by opening a tool like GPU-Z – it will show “Resizable BAR: Yes/Enabled” if all went well. Most RTX 30-series or newer GPUs and RX 6000-series or newer support it (note: NVIDIA only officially enables it for certain games via drivers, but it’s generally beneficial to keep on).
Real-world observations:
Many gamers (and reviewers) report small but noticeable gains with ReBAR. It might be a few FPS on average, but often the biggest gains are in smoother frame delivery (higher 1% lows). It’s basically a free performance uplift if your hardware supports it. As one user put it, it’s “a major feature” and most people on modern systems “should have it on”. There’s essentially no downside to enabling it – at worst a game or two might not like it (rare, and you could always turn it off for that title). So definitely give this tweak a go for an easy win.
Disable CPU c-states for lower latency
Your CPU’s “C-States” are power-saving idle modes that kick in when the processor isn’t busy. On desktops, especially gaming rigs, some tweakers choose to disable C-States in BIOS. Why? Because when C-States are on, your CPU might downclock or temporarily “sleep” some cores when idle, and then ramp up when work arrives. Disabling C-States forces the CPU to stay ready at full clock speed all the time, which can reduce latency and prevent any delay from ramping up clocks during gameplay. This potentially means more consistent frame rates and possibly a slight boost to minimum FPS in CPU-heavy games.
How to disable:
Every motherboard’s BIOS is different, but look for settings like “CPU C-States”, “Enhanced C1E”, or similar under CPU/power management sections. You can switch C-States to “Disabled”. The result is your CPU will no longer go into deep sleep when idle – it’ll run in a high-performance mode continuously (and draw more idle power and run hotter at idle, be aware).
Does it help?
It’s a bit of a mixed bag and can depend on your CPU and power plan. Many years ago, overclockers noticed disabling C-States could smooth out gameplay, and even today some gamers swear by it for keeping minimum FPS a tad higher. For example, one gamer measured about a 1–2 FPS average gain with C-States off (small, but measurable) and noted it helped keep the CPU at max multiplier which “slightly” improved minimum frame rates. The idea is you eliminate the brief moment the CPU might be caught napping at a lower clock. In very CPU-bound games or those sensitive to sudden frame drops, this can reduce micro-stutters.
However – and this is important – results vary. Modern CPUs are pretty good at rapidly boosting clocks, and some rely on C-States for proper boost behavior. On newer processors (like Ryzen 5000/7000 or Intel 12th/13th-gen), there are reports that turning off C-States can backfire, causing higher temps or even stutters in some cases. In fact, some users found that leaving C-States enabled (with a balanced power plan) gave the best responsiveness, and that disabling them made no difference or could conflict with boost algorithms. One Redditor noted that on their Ryzen, disabling C-States improved game performance, but another found it actually introduced stuttering until they turned C-States back on. So, this tweak is a bit experimental – it might help a little, but it’s not guaranteed.
Our take:
If you’re chasing every last drop of performance or trying to troubleshoot input lag/stutter, you can try disabling C-States. Just keep an eye on your CPU temps (idle power will go up) and in-game behavior. If you notice no improvement or worse performance, just re-enable them. It’s a tweak to play around with rather than a sure-fire win. For many, the difference will be minor, but for some, it could smooth out an edge-case scenario.
Enable XMP for faster RAM speeds
This one is a must-do for any gaming PC: make sure you’ve enabled your RAM’s XMP or DOCP profile in BIOS. XMP stands for Extreme Memory Profile – essentially, the advertised speed and timings your RAM is rated for. Out of the box, most DDR4/DDR5 memory will run at a conservative default (like DDR4-2133 or DDR5-4800) unless you explicitly turn on XMP. By enabling it, your memory might jump to something like DDR4-3200, 3600, or whatever it’s rated, which increases bandwidth and can boost game performance in CPU-limited situations.
Enabling XMP:
Go into your BIOS setup and find the memory/XMP setting. It’s usually under an “Overclocking” or “AI Tweaker” menu. You’ll see an option to load XMP Profile 1 (or DOCP on AMD boards) – select it, save, and reboot. Your RAM will now run at its higher clock speed with the appropriate voltage and timings applied automatically.
Performance impact:
While faster RAM doesn’t make a huge difference in every game, it can improve framerates in games that are CPU-bound or when you play at lower resolutions (where the CPU is the bottleneck). More importantly, it often improves the minimum and 1% low FPS, making gameplay smoother in demanding moments. For example, going from 2133 MHz to 3200+ MHz RAM can yield a few percentage points improvement in average FPS, and sometimes more in minimum FPS for certain titles (especially open-world or simulation games that stream a lot of data). One enthusiast noted that having faster RAM tends to help “particularly in game FPS lows” in CPU-heavy scenarios. On older platforms (like first-gen Ryzen), memory speed was critical and could give double-digit percentage gains in some cases. On modern systems, the gains are more modest, but it’s essentially free performance you already paid for when you bought your RAM kit.
Bonus:
XMP is generally safe – it’s not really “overclocking” beyond the RAM’s spec. Just ensure stability (you can run a memory test if you want peace of mind). And as a side benefit, enabling XMP can sometimes also automatically optimize other things; for instance, some motherboards might tune secondary timings or even adjust CPU boost behavior slightly. In short, always use XMP unless you have a specific stability issue with it. It ensures you’re not leaving performance on the table.
Turn off unused virtualization features
If you’re not running virtual machines or using certain Windows security features, it can help to disable virtualization tech on a gaming PC. Windows 11, by default, might have things like Hyper-V, Virtualization-Based Security (VBS), or Core Isolation/Memory Integrity turned on (especially if you did an upgrade install or have certain hardware). These rely on CPU virtualization extensions (VT-x/VT-d on Intel, AMD-V/SVM on AMD) and can introduce a small overhead to system performance. In fact, Microsoft acknowledged that Memory Integrity (a VBS feature) can reduce gaming performance, and recommends turning it off while gaming.
BIOS settings
Enter your BIOS and look for virtualization options. Common ones are “Intel Virtualization Technology (VT-x),” “Intel VT-d,” or “SVM Mode” on AMD. If you’re not using virtual machines or Windows Hyper-V features, you can disable these. (On Intel boards, VT-d is for directed I/O virtualization – used for things like VM device passthrough. It can be turned off for gaming rigs without issue in most cases.)
By disabling virtualization in BIOS, Windows will automatically have Hyper-V and related features inert. This can potentially free up a bit of performance. One optimization guide notes that unless you actually need it, having Hyper-V on means it “runs in the background and consumes resources” on Windows 11. Gamers usually don’t need it on a dedicated rig.
Windows settings
Even if you don’t go into BIOS, you can turn off VBS/Memory Integrity in Windows. Go to Windows Security > Device Security > Core Isolation and make sure Memory Integrity is off. Also, in Apps > Programs & Features > Turn Windows features on or off, uncheck Hyper-V and the Virtual Machine Platform if they’re enabled. After a reboot, VBS should be fully off. This can give a few percent performance boost in games. For instance, Microsoft’s own documentation suggests that turning off Memory Integrity can solve certain gaming performance issues.
Note: The trade-off here is security. Those virtualization-based features do provide extra protection against malware by isolating parts of the OS. If you’re just gaming and practicing safe browsing, you might be comfortable with them off for that extra frame or two of performance. As one tech blogger put it, core isolation means more security but less performance, so decide what balance you’re okay with. You can always re-enable it when not gaming if you want the security back.
In summary, if you’re not actively using any virtualization, flipping it off is a low-risk tweak to reduce overhead. Just remember it might get re-enabled by some Windows updates or if you install certain software (e.g., Docker or Android emulators), so check now and then.
Disable HPET (High Precision Event Timer)
HPET is a hardware timer on your motherboard that Windows can use for tracking time. Sounds innocent, right? The thing is, HPET has gained almost urban-legend status in the PC gaming community. Disabling HPET (both in BIOS and in Windows) is a tweak many swear by to reduce input lag and smooth out gameplay. Others call it placebo. Let’s break it down.
By default, modern Windows uses a combination of timers (TSC + HPET as needed) to schedule tasks. HPET, while very precise, can be slower to access and might cause extra CPU overhead or inconsistent frame pacing on some systems. Some gamers found that forcing HPET off yields better performance. In one dramatic example, a user on the Blur Busters forum reported a 10–20% FPS boost after disabling HPET, with noticeably smoother gameplay and less stutter. That’s huge! They observed higher 0.1% and 1% low framerates, implying less hitching. Another user noted that on one of their PCs, having HPET on caused a “huge FPS drop and everything stutters hard,” whereas turning it off improved smoothness. Those anecdotes explain why this tweak is so popular.
How to disable HPET
First, check your BIOS – not all boards expose it, but if you see “HPET Support” or “High Precision Event Timer” in advanced/chipset settings, disable it there. Next, in Windows, you want to ensure the OS isn’t using it. Easiest way: open an elevated Command Prompt and type:
bcdedit /deletevalue useplatformclockThen hit Enter. (This command tells Windows to stop forcing HPET as the system timer; if you get an error, it’s fine – it might just mean the value wasn’t set.) After that, go to Device Manager, find System Devices, look for High Precision Event Timer, right-click and Disable it. Then reboot. This essentially removes HPET from the equation, leaving Windows to use other timers (like the TSC) which are often higher resolution with less overhead.
Reality check: does it truly help?
It depends on your hardware and maybe even the games you play. There have been cases where people see tangible improvements (as above). Some competitive gamers claim better input responsiveness with HPET off. However, others have tested and found no significant difference in modern systems, or even weird behavior if it’s off. There was some debate that certain benchmarking discrepancies (like artificially higher FPS readings) can occur with HPET off due to how the timer works – essentially calling some of the huge gains “snake oil.” Microsoft’s default is to use a combination of timers for accuracy and performance; HPET is usually only used when needed. In fact, on many Windows 10/11 installs, HPET isn’t actively bogging things down unless a specific app or driver forces it.
Our advice: This is an easy tweak to try, and easy to undo, so it’s worth a shot. If you do it and your games feel smoother – awesome, keep it off. If you notice any odd issues (or no change at all), you can re-enable it just as easily (enable device in Device Manager, or use bcdedit /set useplatformclock true to force it back on, though by default Windows will just use whatever is best if you haven’t forced anything). For many, HPET off does seem to subjectively improve the “snappiness” of the system. Just remember, your mileage may vary. It’s one of those tweaks with almost a cult following, but also some skeptics. Give it a try and see which side you land on!
Disable windows 11 visual effects
Windows 11 looks shiny with its animations and transparency, but all those visual effects can consume a bit of CPU/GPU time. If you prefer pure performance over eye candy, consider turning off the various visual fluff. This won’t magically boost your game’s FPS by 20 or anything, but it makes your desktop feel snappier and ensures more system resources are free for your game. Even Microsoft acknowledges that disabling animations can make the interface more responsive, and guides often suggest turning off visual effects to “boost performance and make the experience feel faster.”
What to turn off
This includes animations (like minimizing/maximizing windows), transparency (the glassy blur effect on the Start menu and taskbar), and other UI effects like shadows and smooth scrolling. On Windows 11, you can do this easily:
- Open Settings > Accessibility > Visual Effects. Toggle off Animation Effects (this kills most animations like window and menu fades). You can also toggle off Transparency Effects if you want (reduces GPU usage for rendering those translucent windows).
- For even more granular control, open the old-school Performance Options panel. Easiest way: hit Start and type “Adjust the appearance and performance of Windows” and open that. Under the Visual Effects tab, you can either select “Adjust for best performance,” which turns off all the fancy stuff, or choose Custom and uncheck things like animations, shadows, etc. For gaming, I typically just nuke them all.
After this, Windows will look a bit more basic (no subtle fading menus, no shadow under your mouse pointer, etc.), but it may feel more instant. Alt-tabbing might be a hair faster without a crossfade animation. More importantly, if you’re on a borderline CPU or using an iGPU, this ensures every bit of compute power is going to the game, not the UI candy.
Registry method
If you like, these can also be done via registry for the hardcore approach. For example, you can disable animations by setting HKEY_CURRENT_USERControl PanelDesktopWindowMetrics values or tweaking HKCUSoftwareMicrosoftWindowsCurrentVersionExplorerVisualEffects. However, since the Settings UI does it cleanly, I’d just use that. The end result is the same.
Performance impact
Don’t expect a huge FPS jump in-game from this alone, especially on a high-end rig – modern PCs handle a few UI animations just fine. The benefit is more about system responsiveness. It’s most noticeable when multitasking. If you alt-tab out of a game to do something, the OS won’t be busy rendering animations – things will just pop. On lower-end systems (or if you’re gaming while streaming/recording), turning off visuals can remove little hiccups. It also can help laptops save some battery and lower GPU temps a bit, since the GPU isn’t constantly drawing transparent frosted glass effects for Windows.
Bottom Line: This is a safe tweak with practically no downside (other than Windows looking less fancy). As a gamer, I prefer function over form when chasing performance, so I always disable these on my rigs. You can always toggle them back on if you miss the sparkle.
Remove network throttling and CPU limits in Windows
Now we get into some classic registry tweaks often cited in “Windows gaming tweak” guides. By default, Windows has certain limitations in place for multimedia processing – these were intended to ensure smooth playback of audio/video by reserving some resources for them. But on a gaming machine, we want to give 100% to our games when needed. Two settings in particular are often tweaked:
Network throttling index
This controls how Windows throttles network packet processing. By default, Windows might limit processing of network traffic (that isn’t multimedia) to a certain rate (it’s related to a legacy idea of reserving bandwidth for multimedia streams). The default value is often 0x0A (10 in hex), which corresponds to a certain packet throughput limit. For gaming, we want no such throttling. Setting network throttling index to 0xFFFFFFFF (that’s 8 F’s) turns off network throttling completely. This can help maximize your network throughput and potentially reduce latency or ping spikes in online games. It essentially tells Windows: “don’t artificially delay or limit network processing for any background tasks – let it run free.”
System responsiveness
This one is about CPU scheduling. Windows reserves a percentage of CPU time for background processes when running multimedia/gaming tasks under a service called MMCSS (Multimedia Class Scheduler). On client versions of Windows, the default reserve is 20%, meaning your games (which are treated as multimedia tasks) can use up to 80% of the CPU, leaving 20% for background stuff. By tweaking SystemResponsiveness in the registry, you can lower that reserve. Setting it to 0 means no reserved CPU for background processes, i.e. let my game have 100% if it needs it. In theory, this can improve performance and consistency, especially if you have some background tasks or streaming going on while gaming.
How to apply these tweaks:
Open Registry Editor (regedit). Navigate to:
HKEY_LOCAL_MACHINESOFTWAREMicrosoftWindows NTCurrentVersionMultimediaSystemProfileHere you’ll find (or you may need to create) the values:
- Network throttling index (DWORD) – set this to 0xFFFFFFFF (hex) to disable throttling. (The default is 0xA on many systems; you can note what it was in case you ever want to revert. A value of 10–70 sets a limit; FFFFFFFF means “no limit”.)
- System responsiveness (DWORD) – set this to 0 (zero) for max gaming responsiveness. (Default is 20 on Windows client, which stands for 20% reserved. On Windows Server it’s 100 by default, meaning 100% reserved for background, which is why servers favor background services.)
After editing, reboot for them to take effect.
What to expect:
With these changes, your system is basically saying “I’m a gaming/media machine – don’t hold back.” In many cases, if you were CPU-bound or if Windows was throttling certain network operations, you might see smoother performance. For example, disabling network throttling could help reduce lag spikes in some online games that send a lot of small packets, according to some reports (games like older Source engine titles, etc., were cited as benefiting from turning this off). Reducing SystemResponsiveness to 0 means if your game needs 99% of the CPU, it can use 99%, instead of being capped to 80%. This could improve framerates or at least prevent background tasks from stealing cycles when you’re gaming.
Reality:
On a modern high-end CPU, you might not notice a dramatic change unless you frequently have stuff running in the background while gaming. But these tweaks cost nothing and do no harm in a pure gaming scenario – your machine likely isn’t doing heavy background rendering while you game, and if it is, well, you probably want the game to get priority anyway. It’s a “why not?” kind of tweak for me.
Important caveat:
Some experts argue that these particular tweaks may have minimal impact on newer versions of Windows. In fact, one seasoned tweaker called some of these registry hacks “old memes” – basically, tweaks that were relevant a decade ago but now either Windows has changed or the effect is negligible. Microsoft’s scheduler has gotten smarter, and some claim that the MultimediaSystemProfile settings aren’t even used much by Windows 11. So, temper your expectations. Still, many in the community continue to include these in optimization guides, and I personally figure there’s no harm in having them set optimally. I have NetworkThrottlingIndex=FFFFFFFF on all my rigs and zero issues.
If you ever wanted to revert: just delete the NetworkThrottlingIndex entry (or set it back to 0xA) and set SystemResponsiveness back to 20 (or delete it, since 20 is default on client Windows).
Prioritize GPU and gaming tasks in the registry
Continuing with our registry adventures, there are a few more values under the MultimediaSystemProfile tweaks that focus on the GPU and game scheduling. These live under a subkey called SystemProfileTasksGames – basically a profile for tasks classified as “Games” by the scheduler. The idea is to tell Windows: “hey, when it comes to games, give them top priority on the GPU and I/O.”
Navigate in regedit to:
HKEY_LOCAL_MACHINESOFTWAREMicrosoftWindows NTCurrentVersionMultimediaSystemProfileTasksGamesIn that key, you’ll see some values (if not, they might not exist until set – you can add them):
- GPU Priority (DWORD) – Default is 2. You can set this to 8, which is the highest it allows (range 0-31, but effectively, 8 is often recommended max). This purportedly gives gaming tasks a higher priority when contending for GPU resources.
- Priority (DWORD) – This is the task priority. Default is 2 for games. You can set to 6 for higher priority. Note: If Scheduling Category (see next) is “High”, the system might ignore a higher Priority value and cap it at 2 anyway, but we’ll set it just in case or for when category isn’t high.
- Scheduling Category (REG_SZ string) – Default is “Medium”. Change it to “High”. This is a big one – it tells Windows that games are high priority tasks (like how audio or video might be handled to avoid glitches).
- SFIO Priority (REG_SZ string) – This stands for “Scheduled I/O Priority”. Default is “Normal”. Set it to “High”. This prioritizes file I/O for games (e.g., disk reads/writes – in theory, helping reduce loading stutters if something else is also accessing disk).
After editing those, reboot to apply. These tweaks together essentially max out the priority for anything classified as a “Game” by MMCSS.
Does it actually do anything?
According to Microsoft’s docs, these settings exist, and on paper they should help ensure games get preferential treatment. In practice, it’s a bit murky how much effect you’ll see. If your system is under heavy load from other processes, this could help the game maintain performance by deprioritizing background tasks even more. If your system is generally free when gaming, you might not notice a change. But I have noticed on some setups, after doing this, there was a slight improvement in consistency (perhaps fewer background process interruptions). And at least one Windows tuning guide suggests that raising GPU priority and using High scheduling can help “stabilize frame time” in some cases.
It’s worth noting that a well-known network tweak guide mentioned that some of these Games profile settings might not be actively used by newer Windows versions – i.e., they might be legacy. So again, don’t expect miracles. However, setting them doesn’t hurt system stability. I look at it this way: if there’s even a small chance Windows will give my game thread a bit more GPU timeslice or I/O bandwidth because of this, I’ll take it.
Pro tip:
One thing to keep in mind is that Windows 11 has an actual Graphics settings panel (under System > Display > Graphics) where you can set per-app GPU preferences (especially if you have multiple GPUs). That’s unrelated to these tweaks but is another area you can ensure your game is set to “High performance” GPU if you have an integrated + discrete combo. Also, Windows 11 includes Hardware-Accelerated GPU Scheduling (HAGS) – make sure that’s enabled (Settings > Display > Graphics > Change default graphics settings). HAGS is kind of like letting the GPU handle its scheduling more, potentially reducing latency. It’s not a registry hack (though it can be toggled via reg), but it’s a good setting to double-check for gaming.
To summarize this section: by tweaking the Games profile, you’re basically telling Windows to treat your games like VIPs in terms of CPU, GPU, and I/O priority. It’s an advanced tweak that may or may not tangibly help, but it aligns with our goal of removing any potential OS-imposed priority limits on our games.
Additional tweaks and final tips
We’ve covered the big guns in BIOS and registry tweaks, but before we wrap up, here are a few extra tips and observations that don’t fit neatly in the above categories:
- Game mode: Windows 11’s Game Mode is ON by default, and it’s generally a good thing. It prioritizes your game process and can prevent Windows Update or other background activities from interrupting. Double-check it’s on (Settings > Gaming > Game Mode). It won’t drastically change performance in most cases, but no reason to turn it off unless it causes an issue with a specific game (rare).
- Xbox game bar and captures: If you’re not using the Xbox Game Bar for recording or screenshots, you might as well disable the background recording feature. In Settings > Gaming > Captures, set “Record what happened” (background DVR) to off. Background recording can eat some resources. The Game Bar itself doesn’t usually hurt to leave enabled (and it’s useful for checking performance with the Win+G overlay), but if you never use it, you can disable it entirely in its settings or via a registry tweak. I’ve found that disabling background capture helped reduce stutters in longer play sessions, especially on systems with limited RAM or when I was nearing VRAM limits (it freed up a bit of memory and disk I/O).
- Drivers and BIOS updates: Not a tweak per se, but keeping your GPU drivers up to date and checking your motherboard BIOS for updates can ensure you have the latest performance improvements. BIOS updates sometimes include fixes for things like resizable BAR or stability improvements for XMP and so on.
- Temperature and power: All the tweaks in the world won’t help if your GPU is thermal throttling or your CPU is power-limited. Make sure your cooling is adequate. Sometimes, what feels like a Windows issue can just be the CPU hitting 100°C and throttling down. If you’ve disabled C-States and see higher idle temps, keep an eye that your load temps are still safe.
- Community wisdom: The PC gaming community is full of passionate tweakers (I mean, hi, you’ve read this far!). A lot of these tweaks came from people testing and sharing results on forums and Reddit. The consensus over the years changes – some tweaks become obsolete as Windows evolves, new ones pop up. It’s good to stay skeptical and test yourself. For instance, we saw how opinions differed on things like HPET or C-States. My rule: if a tweak is easy to reverse and commonly discussed, I’ll try it. But I always benchmark or play a familiar game after each change to see if it actually helped or at least didn’t hurt. Don’t blindly stack 50 tweaks and assume all is well – you might end up hurting performance or stability and not know which tweak did it.
- Backup and safety: I’ll say it again – back up before major changes. Export registry keys before editing them (just in case you need to restore). And maybe don’t apply 10 BIOS tweaks at once; do a couple, test, then proceed.
At the end of the day, the gains from these advanced tweaks will likely be incremental. You might get a few percent here, a few milliseconds latency there. There’s no single switch that doubles your FPS (if only!). But for us enthusiasts, half the fun is in the tweaking process itself. When you do feel that your game is a bit smoother or your system a bit more responsive, it’s a satisfying win.
Happy tweaking, and may your frame rates be high and steady! If you discover any new tips or see noticeable improvements from these, share your findings with the community – we’re all in the same quest for that perfectly optimized gaming rig. Good luck and game on!