So you’ve built your PC or upgraded to Windows 11, and now you want those extra frames per second and lower latency without buying new hardware. Good news – there are a bunch of built-in Windows 11 settings you can tweak to squeeze out more performance.
As a fellow gamer, I’ve learned that a little OS fine-tuning can make a noticeable difference in gameplay smoothness. We’re going through practical software-level tweaks from power plans to visual effects that can help boost your FPS and reduce input lag. Grab your RGB beverage of choice because we’re getting into it.
Disable Background Apps and Kill the Bloat
One of the quickest wins is closing or disabling unnecessary background apps. Games are resource-hungry, and you don’t want other programs stealing CPU, GPU, or RAM while you’re in a match. Windows 11 has a habit of running things in the background – chat apps, updaters, even parts of Microsoft’s ecosystem that you might not need during gaming. By shutting those down, you free up resources for your game. I make it a habit to close web browsers, Discord if I’m not using it for voice chat, and any software updaters before launching a big game.
Fewer background processes mean your CPU can devote more cycles to the game, and your memory isn’t filled with random stuff. This isn’t just theory – you can actually feel the difference, especially on systems with limited RAM or older CPUs.
Windows Central notes that having too many apps launch at startup can slow down gaming, and trimming them can lead to a noticeable boost in gaming performance. Think about it – if five apps are running in the background doing updates or syncing, that’s five potential sources of stutter or frame drops.
By keeping background and startup apps to a minimum, you reduce competition for your PC’s resources. In fact, reducing background tasks not only prevents frame rate drops but can also cut down on input lag – those delays between your mouse or keyboard actions and what happens on screen.
I remember wondering why a particular shooter felt sluggish. Turns out a OneDrive sync and a Chrome tab with a video were running. Closing those made the game feel snappier immediately.
How to Do It?
Use the Task Manager with Ctrl + Shift + Esc to check what’s consuming resources and end tasks that aren’t needed while gaming. Also, go to Settings, then Apps, then Startup, and turn off any high-impact startup programs you don’t need.
Next time you reboot, you’ll have a leaner system running only the essentials. Bottom line – your game gets priority on your PC’s diet. No more sharing precious CPU cycles with that random updater or widget. This tweak alone can yield a smoother gaming experience, especially if you were unknowingly running a bunch of stuff in the background.
Optimize Visual Effects for Performance
Windows 11 is pretty. It’s got translucent windows, animations when you minimize or maximize, shadow effects, and all that jazz. Those UI effects make the desktop look nice, but they also consume a bit of CPU and GPU power.
When maximizing performance is the goal, consider turning off some of these visual bells and whistles. It can make your system feel immediately snappier in general use. Now, I won’t claim that disabling animations will give you plus 20 FPS in Elden Ring, but it will lighten the overall load on your system, which can indirectly help games. And it certainly makes alt-tabbing faster.
Personally, I went into Settings, then Accessibility, then Visual Effects, and turned off transparency and animation effects. The difference in desktop responsiveness was noticeable. Windows snap open without that tiny delay for the animation to play.
If you want to go further, you can use the classic performance options dialog. Press Win + R, type systempropertiesperformance.exe, and set it to adjust for best performance. That will disable most eye-candy like smooth fonts and shadows in one go.
Suddenly, Windows looks a bit more like Windows 7 Basic, but it uses less resources. On older or entry-level hardware, like an aging laptop with integrated graphics, this can actually feel like a major improvement in responsiveness. You’re cutting out extra work the GPU and CPU were doing to draw animations and transparent effects.
On modern gaming rigs, the impact is smaller, but I still prefer the snappier feel. According to a Windows forum analysis, toning down visual effects reduces unnecessary rendering load and can free up slight CPU and GPU resources, making window interactions faster without affecting game content.
It’s a small tweak, but every bit of saved performance helps create that smooth experience. And hey, you’re here for practical tips – this one is easy and 100 percent reversible if you miss the shiny Windows.
Tweak Your Power Plan to Unleash Performance
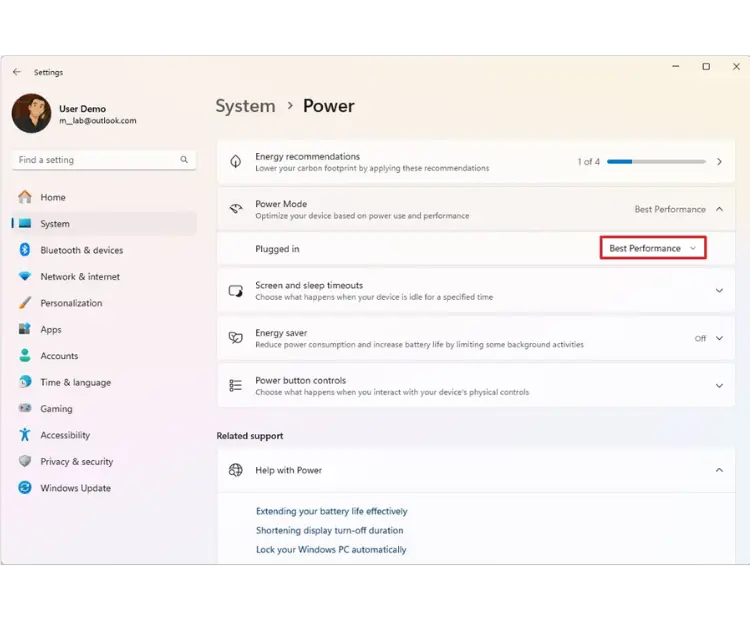
Another key tweak is making sure your PC is in a performance-oriented power mode. Windows 11, by default, often uses a balanced power plan to save energy. Balanced is fine for everyday use, but when gaming, we want the system to unleash its full potential.
Switching to the high-performance mode labeled “Best Performance” in Windows 11 settings tells the OS to prioritize performance over energy savings. This means your CPU won’t downclock as aggressively when idle, and your components will be primed for consistent output.
From my experience, using the Best Performance plan gave me more stable frame rates. The average FPS might only improve a tiny bit, but the key is the 1 percent lows. Those occasional dips in frame rate tend to be higher, meaning fewer slowdowns during intense moments.
One gamer found that high-performance mode improved the low-end frame times, making gameplay feel smoother even if peak FPS didn’t change much. Essentially, it reduces the chances that Windows will decide to downclock your CPU in the middle of a match to save power, which could cause a brief hitch.
Windows Forum’s guide confirms this, noting you get more consistent frame rates in games by using a higher performance profile at the cost of more power draw and heat.
To enable it, head to Settings, then System, then Power and Battery, and set the power mode to Best Performance when you’re plugged in. On desktops, it’s always plugged in. On gaming laptops, definitely plug in while gaming – you get dramatically better performance that way.
Once set, Windows will favor performance. The CPU stays in turbo mode more readily, and components won’t enter power-saving states as quickly. Keep in mind your machine might run a bit hotter or louder. That’s normal when it’s not trying to be quiet.
Also, if you ever need to conserve battery, for instance, if you’re on a plane or something, switch back to balanced or battery saver as needed. But for our purposes, wringing out maximum FPS, the Best Performance power plan is the way to go.
It’s an easy toggle that ensures your hardware is delivering everything it can. As one Windows enthusiast put it, this can lead to faster app launches and more consistent gaming performance on AC power.
Enable Game Mode and GPU Scheduling Features
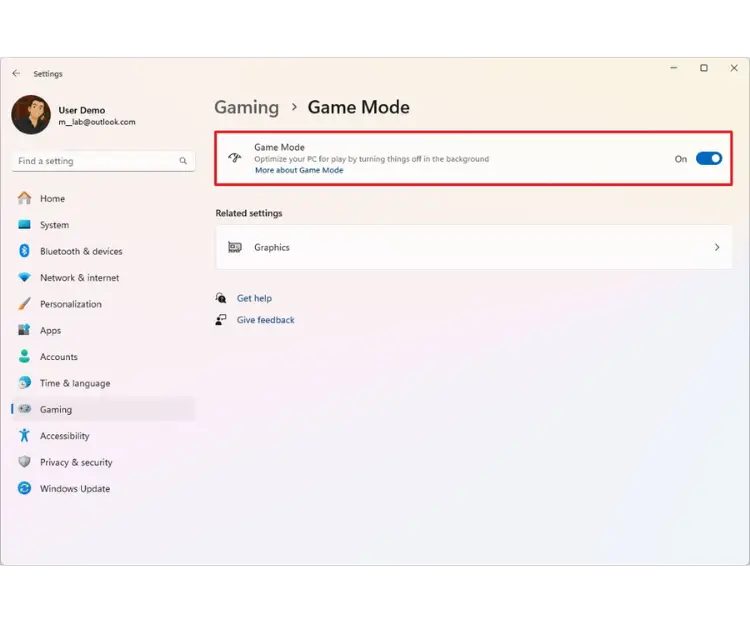
Windows 11 comes with a few features specifically aimed at improving gaming performance. First up is Game Mode. This is a built-in setting that, when enabled, tells Windows, “Hey, I’m playing a game – do what you can in the background to help this run better.”
In practice, Game Mode reduces background activity. It prevents things like Windows Update from kicking in, and it prioritizes the game process so it gets more CPU and GPU attention. The good news is Game Mode is usually on by default in Windows 11, but it’s worth checking. Go to Settings, then Gaming, then Game Mode, and ensure the toggle is on.
Does Game Mode actually help? From my experience, it can help on systems that are mid-range or if you tend to have other stuff running. It’s not a magic switch for plus 20 FPS, but Microsoft designed it to minimize interruptions and give a slight edge to your game.
Windows Central notes that the impact can vary depending on your system and the game, but it often leads to improved performance, especially if your PC would otherwise struggle with background tasks. For example, if some background process starts while you’re gaming, Game Mode might throttle it to prevent a spike of lag.
I’ve noticed fewer alt-tab related stutters and no random antivirus scans kicking off mid-game when Game Mode is active. It integrates with Windows Security to adjust that during play.
Another feature to leverage is hardware-accelerated GPU scheduling, often shortened to HAGS. This one is a bit under-the-hood. It allows your GPU to manage its own memory and scheduling for frames instead of the Windows graphics subsystem doing it.
In theory, this can reduce latency and overhead by cutting some of the GPU scheduling tasks from the CPU’s responsibility. In Windows 11, if you have a relatively modern GPU, you can find this setting under Settings, then System, then Display, then Graphics, then Default Graphics Settings, then Hardware-Accelerated GPU Scheduling. Flip that on, and a reboot is usually required.
Many systems have it enabled by default these days, but not always. The benefit of HAGS is modest. We’re talking a few percentage points of improvement at best, and some people might not feel any difference. However, some gamers have reported slightly smoother frame pacing or a minor bump in minimum FPS with it on. It essentially lets the GPU driver handle more timing, which on certain CPU-bound scenarios can help.
From my gamer perspective, I turned HAGS on when it first came out in the Windows 10 era and honestly didn’t see much change in most games, but I left it on since it didn’t hurt. Over time, as drivers matured, I did start noticing that some games felt a bit more responsive. Could be placebo, but hey, if the setting is there to reduce latency, I’ll take it.
According to Microsoft’s description, this feature is about improving performance and reducing latency by offloading work to the GPU. It’s a low-effort tweak. Either it helps a tiny bit, or it makes no difference, but rarely does it negatively impact things. If it does, you can easily turn it off.
So between Game Mode and HAGS, make sure they’re enabled. They represent Windows 11’s built-in gamer hacks, and while they won’t transform your PC, they contribute to that cumulative improvement we’re after.
Pro Tip: Also consider turning off Xbox Game Bar background recording if you’re not using it. Windows 11 has the Xbox Game Bar for screenshots and recording. If you have the “Record what happened” background DVR enabled, it can eat some resources continuously. Go to Settings, then Gaming, then Captures, and ensure background recording is off unless you actively use it. This frees up a bit of CPU and GPU, which can slightly improve performance and latency as well.
Adjust Virtual Memory for Smoother Performance
This tweak is a bit more under-the-hood, but it’s important for ensuring smooth performance: virtual memory settings. Virtual memory, or the page file, is essentially a portion of your storage drive that Windows uses as fake RAM when you run low on actual physical RAM.
If you’ve got 32GB of RAM, you might never really feel the effects of the page file. But if you’re on 8GB or 16GB and playing a big open-world game, or you like to keep Chrome open with 50 tabs while gaming – we’ve all been there – you could be hitting the memory limit.
When that happens, Windows starts pushing some data to the page file on disk, which is much slower than real memory. That’s when you get stutters, or the game might hitch when you alt-tab or load a new area.
To optimize this, you want to make sure your page file is configured correctly. In most cases, letting Windows manage it is fine, but some enthusiasts like to set a custom size to ensure it’s large enough and doesn’t dynamically resize, which can momentarily cost performance.
A common rule of thumb is an initial size of 1.5 times your RAM and a maximum of 3 times your RAM. For example, with 8GB RAM, that’d be 12GB initial and 24GB max. This ensures Windows always has room to swap things out if needed.
If you have a second drive, especially if your OS is on a slower HDD and you have an SSD secondary or vice versa, some folks put the page file on the secondary drive to spread out disk I/O.
Now, will tweaking virtual memory boost your FPS by itself? Not directly. It’s more about preventing slowdowns. The goal is to avoid a scenario where Windows runs out of RAM and chokes. If you only have, say, 4GB to 8GB of RAM, then yes, having a well-configured page file can significantly improve performance once that RAM fills up.
Basically, your system will handle memory overflow more gracefully, avoiding some of the massive stutters or freezes. Even with 8GB to 16GB, you could get a boost in performance by tuning the page file, according to one Windows 11 optimization guide.
Above 16GB, the benefits are less obvious, but I still keep a small page file just in case a game has a memory leak or a mod goes crazy. I’ve seen games hard-crash with an out-of-memory error on systems with no or too small page file, even if physical RAM wasn’t completely maxed, simply because they expect one to be there.
Check your virtual memory settings. Go to Advanced System Settings, then Performance, then Advanced, then Virtual Memory. If you had previously disabled the page file, some guides erroneously suggest that for performance, I’d recommend re-enabling it on at least one drive.
A good size is maybe 8GB to 16GB fixed, or just let Windows dynamically manage it. Modern NVMe SSDs are so fast that using them for the page file is not a big deal. The old advice was that it wears out the SSD, but realistically, the impact is minor for a gaming workload scenario.
Having that safety net will ensure that if your game needs a bit more memory, it can swap to disk instead of stuttering heavily or crashing. Remember, unused background apps also gobble up RAM, leaving less for your game. Then Windows resorts to paging to disk, which can cause the dreaded hitching.
By optimizing virtual memory and closing bloat, as discussed earlier, you minimize those slowdowns due to memory starvation. It’s about making Windows 11 handle memory as efficiently as possible so your games stay smooth.
Enable Fast Startup for Quicker Boot Times
This next tip is more about quality of life and getting into your games faster: Fast Startup. Windows 11’s Fast Startup, also called Fast Boot, is a feature that shortens your boot time when you turn on the PC after a shutdown.
It combines some elements of hibernation to speed up the boot process. Now, to be clear, Fast Startup doesn’t directly boost in-game FPS or reduce network latency, but it does help you get from powered-off to playing more quickly, which I’d argue is still a win for impatient gamers like me.
With Fast Startup enabled, when you shut down your PC, Windows actually saves a snapshot of the core system, the Windows kernel, and drivers to a file instead of fully closing everything. Then, when you power back on, it loads that snapshot. The result is you see your desktop a lot faster than a cold boot.
On modern NVMe SSDs, the time saved might be just a few seconds, but hey – a few seconds here, a few there, and soon you’re in the game lobby while your friend’s PC is still booting. On older machines or those with HDDs, Fast Startup can shave off a more noticeable chunk of boot time.
Windows 11 typically has Fast Startup enabled by default unless you did a fresh install and turned off hibernation, which disables Fast Startup too. You can find it in the old Control Panel: Control Panel, then Hardware and Sound, then Power Options, then Choose what the power buttons do.
There, you’ll see “Turn on Fast Startup (recommended)” with a checkbox. If it’s unchecked and available, try enabling it and hit save. If it’s missing, it might be because Hibernate is off. You can re-enable it with powercfg /hibernate on in an elevated command prompt.
From personal experience, Fast Startup has been a tiny but nice improvement. My desktop with an SSD boots in about 15 seconds normally. With Fast Startup, it might do it in 10 to 12 seconds. Not a massive difference, but psychologically it feels almost instant.
Hit power, grab a drink, and by the time I sit, I’m at the login screen. Just note that a restart is not affected by Fast Startup. Restarts always do a full fresh boot of the kernel. So, if you need to fully reset everything, say after a driver update or if you suspect a memory leak, do a restart instead of shut down.
There are also a few caveats. If you dual-boot OSes or frequently enter BIOS, Fast Startup can sometimes interfere since the system isn’t doing a full shutdown. But for the average gamer who just boots into Windows 11 every time, it’s generally beneficial.
To sum up Fast Startup – it’s a convenient Windows feature that gets you gaming faster by cutting down boot time. It doesn’t make your games run faster once you’re in, but it reduces the waiting around. And less waiting equals happier gaming, right?
If you haven’t toggled this one, give it a try and see if you notice the difference next time you start your PC. Every second counts when your squad is already online and you’re rushing to join.
Advanced Tweak: Disable Security Features at Your Own Risk
I’ll throw in one more advanced tip for the truly performance-obsessed: temporarily disabling certain Windows 11 security features during gaming sessions. This is not something I recommend to casual users, but PC enthusiasts might appreciate the option.
Windows 11 has a security feature called Memory Integrity or Core Isolation and related virtualization-based protections. These are great for security; they help protect against malware by isolating kernel memory, but they do have a small performance cost.
In fact, Microsoft acknowledged that Memory Integrity and the Virtual Machine Platform can cause noticeable slowdowns in games, advising gamers to turn them off while playing. How much slowdown are we talking? Tech testers found about a 5 percent average hit to gaming performance on certain CPUs with these features enabled, with some games seeing up to roughly an 8 percent drop.
That’s roughly equivalent to losing a few FPS or your CPU behaving like a slightly older model. Not enormous, but for us FPS hawks, 5 percent is 5 percent.
I actually tried this on my system. I went into Windows Security, then Device Security, then Core Isolation, and turned off Memory Integrity, then rebooted. I also disabled the Virtual Machine Platform component via Windows Features since it ties into the same virtualization layer.
Lo and behold, one of my racing games that was CPU-bound went from roughly 110 FPS to 116 FPS average. It wasn’t a mind-blowing change, but it was measurable. Another gamer with a similar tweak reported gaining up to 10 FPS in heavy games like Forza Horizon 5 and Cyberpunk 2077 by disabling Memory Integrity and Core Isolation. That’s a pretty solid boost just from a software switch.
However, big caution: turning these off slightly reduces your system’s security. I only recommend doing it if you understand the risks and maybe if your PC isn’t exposed to high risk. For example, you only game on it and don’t browse sketchy sites, etc.
Microsoft itself recommends re-enabling these features after you’re done playing. That’s what I do. I have Memory Integrity off only when I’m benchmarking or in a long gaming session for that extra edge, and I toggle it back on when I’m back to normal tasks.
The nice thing is Windows makes it easy to toggle with a reboot each way. So, this is an advanced optional tweak for those comfortable in the Windows Security settings. It can shave off that last bit of latency. I did feel my system was a tad more responsive with it off, though it might be placebo.
In GPU-limited scenarios, it won’t matter, but if you’re CPU-limited, it can help a bit. Use it wisely. If you’re not comfortable with this, feel free to ignore this section. You can still get plenty of gains from the other tweaks without messing with security features.
Wrapping It All Up
We’ve covered a lot of ground from simple UI settings to more hidden system tweaks, all with the aim of making your Windows 11 gaming experience faster and smoother. The great thing is none of these cost a dime. You’re optimizing the software side to get the most out of your existing hardware.
From my own journey, doing these tweaks turned my system from a decent gaming rig to a snappier, more responsive one. The differences can be subtle individually, but add them up and you might notice your favorite games running a bit steadier: fewer FPS drops, less input lag, quicker load times. And even outside of games, your PC will likely feel more responsive for everyday use.
Remember, every PC is different. Part of the fun of being a PC enthusiast is experimenting. Don’t be afraid to play around with these settings. All are reversible. Maybe start with the easy wins like background apps, Game Mode, and power plan, and see how it feels. Then try the more involved ones like visual effects or virtual memory if you’re curious.
Keep an eye on your game’s performance. Windows has an Xbox Game Bar performance overlay, or use tools like MSI Afterburner to see if you get FPS or frame time improvements. Sometimes the gains will be in consistency rather than raw FPS numbers. For example, your 1 percent low FPS might improve, which translates to a smoother experience.
The tweaks we’ve discussed here are the core ones I recommend to every gamer friend who asks, “How can I get more FPS without upgrading my PC?” They’re straightforward, they have real-world impact as we’ve seen from user experiences and tests, and they keep your system stable. We’re sticking to built-in settings, no sketchy third-party optimizer apps.
At the end of the day, squeezing extra performance from your OS is about removing bottlenecks and unnecessary overhead. Windows 11, for all its improvements, still has some default settings that aren’t fully optimized for gaming out-of-the-box. With a few toggles and adjustments, we can bridge that gap.
I hope you find your games just a bit more enjoyable after applying these tweaks. I’ll see you on the next fragfest, now hopefully with higher FPS and lower latency. Happy gaming, and may your shots always register and your frame rates stay sky-high.